Setting Up Amazon WorkSpaces With Simple AD Even if That's Unavailable in Your AWS Region: Through VPC Peering, AD Connector, and a Route 53 Resolver Outbound Endpoint (Orchestrated With Terraform)
Long title, but whatcha gonna do.
At work, which is a well-connected service provider in Germany’s energy industry and thus not the least likely target1 of state-sponsored hackery, we’re constantly evaluating new solutions to improve our business continuity management (BCM) – without buzzwords, that’s preparations to get back up and running quickly if our main infrastructure were to be compromised.
One component of our strategy involves replicating certain parts of our infrastructure on the Amazon cloud using Terraform in a sort of colder-than-cold-standby manner where – except when we’re running disaster simulations – this infrastructure replica plain doesn’t exist; we only keep its Terraform specification2 around. That’s kind of neat because non-existent infrastructure doesn’t cost all that much.
Recently, I was tasked with bringing Amazon WorkSpaces into this mix to provide virtual desktops. In case you’re not familiar with it:
Amazon WorkSpaces enables you to provision virtual, cloud-based Microsoft Windows, Amazon Linux 2, Ubuntu Linux, or Red Hat Enterprise Linux desktops for your users, known as WorkSpaces. WorkSpaces eliminates the need to procure and deploy hardware or install complex software. You can quickly add or remove users as your needs change. Users can access their virtual desktops from multiple devices or web browsers.
As we already use PCoIP-enabled zero/thin clients to access our existing infrastructure, being able to re-point these same (too-dumb-to-be-compromised) clients at WorkSpaces at a moment’s notice sounded ideal – with just one drawback: User management and authentication on WorkSpaces works via Active Directory, and since that’s not required by the infrastructure subset we’re replicating on AWS, we weren’t planning on rebuilding our existing domain there. Keeping things simple ought to pay off when you’re scrambling to get up and running again, and having to configure (and secure) a Microsoft Active Directory in a pinch is, by all accounts, the opposite of simple.
Speaking of “simple” – luckily, Amazon offers Simple AD, an inexpensive directory service that’s just “featureful” enough to support WorkSpaces.
Simple AD is a standalone managed directory that is powered by a Samba 4 Active Directory Compatible Server. […]
Simple AD provides a subset of the features offered by AWS Managed Microsoft AD, including the ability to manage user accounts and group memberships, create and apply group policies, securely connect to Amazon EC2 instances, and provide Kerberos-based single sign-on (SSO). However, note that Simple AD does not support features such as multi-factor authentication (MFA), trust relationships with other domains, Active Directory Administrative Center, PowerShell support, Active Directory recycle bin, group managed service accounts, and schema extensions for POSIX and Microsoft applications.
Given our minimalist use case, none of these limitations bother us.
Unfortunately, Simple AD is only available in certain AWS Regions, which eu-central-1 (Frankfurt) is not among3 – yet being located in Germany and physically closest to us, that’s the Region we had selected for this project.
While we could migrate our infrastructure replica to, say, eu-west-1 (Ireland) relatively easily (it being specified with Terraform and all), we decided4 to first explore whether it’d be possible to connect a Simple AD in Ireland with WorkSpaces in Frankfurt. Some cursory googling yieled conflicting answers, so we went ahead and just kind of tried – which wasn’t entirely straightforward (and, spoiler alert, doesn’t even end up saving money compared to a Managed Microsoft AD), hence (and anyway): this blog post documenting what’s required.
Note: If you aren’t using Terraform yourself, you’ll still be able to follow along via the AWS Management Console (or your IAC tool of choice). Plus, even if you’re not planning on implementing the exact same setup using the technologies mentioned in the title, this post will give some pointers on diverse topics like working with multiple AWS Regions, automatically joining EC2 instances to a directory via SSM (and debugging seamless join failures), ports to open for directory services, setting up a VPC peering connection, getting started with WorkSpaces, and maybe more, who knows!
Overview

This draw.io diagram provides a high-level overview of the infrastructure I’ll be setting up in this post, omitting some details like security groups. Don’t be shy about scrolling back up to it as you read on. The blue arrow signifies the logical path taken by AD authentication from WorkSpaces in Frankfurt to the Simple AD in Ireland. The red arrows symbolize how EC2 instances are joined to the directory. Grey arrows merely indicate how WorkSpaces set up this way can seamlessly “talk” to other parts of the infrastructure.
Preamble: Mapping Availability Zone IDs to AZ names
We’ve got a fairly standard VPC setup in Frankfurt. There’d be no point writing another word about it (I’ll show the code in a minute) if it weren’t for the fact that Amazon WorkSpaces is only available in a subset of the Availability Zones for each supported Region: in Frankfurt, for example, only euc1-az2 and euc1-az3 support WorkSpaces – so we wanted to make sure to deploy most of our infrastructure in these AZs and not, say, euc1-az1.
You might be more familiar with a different naming scheme for AZs: Those two zones would be eu-central-1b and eu-central-1c, right? Wrong! (Probably. (Confused?))
Quoting from the AWS documentation linked above:
[W]e independently map Availability Zones to names for each AWS account. For example, the Availability Zone
us-east-1afor your AWS account might not be the same location asus-east-1afor another AWS account.To coordinate Availability Zones across accounts, you must use the AZ ID, which is a unique and consistent identifier for an Availability Zone. For example,
use1-az2is an AZ ID for theus-east-1Region and it has the same location in every AWS account.
Anther documentation page elaborates on the reasoning behind this:
This approach helps to distribute resources across the Availability Zones in an AWS Region, instead of resources likely being concentrated in Availability Zone “a” for each Region.
If you’re logged into your AWS account right now, you can see how this randomized mapping worked out for you here in the EC2 console.
Since the subnet we’re intending to “house” our WorkSpaces in must be located in euc1-az2 or euc1-az3 (that’s where WorkSpaces is available, after all), yet throughout Terraform, the eu-central-1x nomenclature is used, we require a mapping function between the two.
# usual required_providers boilerplate
terraform {
  required_providers {
    aws = {
      source  = "hashicorp/aws"
      version = "~> 5.0"
    }
  }
}

# for completeness' sake, first the provider for frankfurt
# note that we'll add a second aws provider for ireland later (with an alias)
provider "aws" {
  region = "eu-central-1"
  allowed_account_ids = [...]  # fill in to prevent accidentally messing with other stuff

  # set some tags on created objects to track what's been set up via terraform
  default_tags {
    tags = {
      "Terraform"   = "true"
      "Environment" = "..."
    }
  }
}

# get available azs
data "aws_availability_zones" "available" {
  state = "available"
}

locals {
  # map between az ids and names (look up by id, returns name)
  # via https://stackoverflow.com/questions/77763318/terraform-create-map-of-az-id-to-name
  az_id_to_name_map = { for az in data.aws_availability_zones.available.zone_ids : az => element(data.aws_availability_zones.available.names, index(data.aws_availability_zones.available.zone_ids, az)) }

  # then set up a list of two or three azs (to set up subnets in later on, depending on your resiliency requirements)
  # making sure "euc1-az2" (where workspaces is available) is at index 0
  # see https://docs.aws.amazon.com/workspaces/latest/adminguide/azs-workspaces.html
  azs = [
    local.az_id_to_name_map["euc1-az2"],
    local.az_id_to_name_map["euc1-az3"],
    #local.az_id_to_name_map["euc1-az1"]
  ]
}
If we now create public and private subnets based on that azs list, we can be sure that the respective 0-indexed subnets will be suitable for WorkSpaces.
Two VPCs5
We like to use the terraform-aws-modules/vpc/aws module to keep VPC boilerplate6 to a minimum. Accordingly, our VPC in Frankfurt is set up like this:
locals {
  vpc_cidr = "10.0.0.0/16"
}

# vpc, documentation see https://github.com/terraform-aws-modules/terraform-aws-vpc
module "vpc" {
  source  = "terraform-aws-modules/vpc/aws"
  version = "5.6.0"

  name                         = "main-vpc-in-frankfurt"
  cidr                         = local.vpc_cidr
  enable_nat_gateway           = true
  single_nat_gateway           = true
  enable_dns_hostnames         = true
  azs                          = local.azs
  public_subnets               = [for k, v in local.azs : cidrsubnet(local.vpc_cidr, 8, k)]
  private_subnets              = [for k, v in local.azs : cidrsubnet(local.vpc_cidr, 8, k + 3)]
  database_subnets             = [for k, v in local.azs : cidrsubnet(local.vpc_cidr, 8, k + 6)]
  create_database_subnet_group = true
}
Nothing too special (except for the fact that we specially prepared the azs list as explained above) – it’s just a bunch of subnets housing various servers and a couple of fairly beefy databases that aren’t relevant in the context of this post. Our WorkSpaces machines will be able to access these resources and we’ll be able to control this access by referencing the WorkSpaces security group (more on that later).
To set up a VPC for Simple AD in Ireland, we first need to add another AWS provider into our Terraform project, setting an alias to assign a unique name to this second provider.
provider "aws" {
  alias = "ireland"  # to avoid conflicts with main provider, https://dev.to/devops4mecode/deploy-aws-resources-in-different-aws-account-and-multi-region-with-terraform-multi-provider-and-alias-ie9

  region = "eu-west-1"
  allowed_account_ids = [...]

  # set some tags on created objects to track what's been set up via terraform
  default_tags {
    tags = {
      "Terraform"   = "true"
      "Environment" = "..."
    }
  }
}

data "aws_availability_zones" "available_ireland" {
  state = "available"

  # include this line for any resources you wish to create in ireland
  provider = aws.ireland
}
The VPC itself – only intended to house our Simple AD and a small EC2 instance for AD administration tasks – can be more basic than our “main” VPC in Frankfurt, only requiring public subnets (in different AZs, but here it doesn’t matter which AZs) for the AD’s two domain controllers according to Amazon’s documentation. I opted for public subnets to avoid having to set up (more importantly: pay for) a NAT gateway for internet access.
# vpc for simple ad, roughly matching https://docs.aws.amazon.com/directoryservice/latest/admin-guide/simple_ad_tutorial_create.html
module "vpc_ireland" {
  source  = "terraform-aws-modules/vpc/aws"
  version = "5.6.0"

  name               = "ireland-vpc-for-simple-ad"
  cidr               = "10.40.0.0/16"
  enable_nat_gateway = false
  azs                = ["eu-west-1a", "eu-west-1b"]
  public_subnets     = ["10.40.0.0/20", "10.40.16.0/20"]
  private_subnets    = []

  # terrraform modules require a different "provider override" notation than resources
  providers = {
    aws = aws.ireland
  }
}
Since we’ll be establishing a connection between the two VPCs through VPC peering, their CIDR ranges must be disjoint, so I selected 10.40.0.0/16 for vpc_ireland. That’s because “40” looks7 like “AD” if you squint a little (or, admittedly, a lot).
Simple AD
Setting up Simple AD is, well, simple. (That’s where using an AWS-managed service really shines.)
locals {
  simplead_fqdn = "ad.ourcooldomain.com" # we've registered a different domain for this project, but you don't need to know about it
}

resource "aws_directory_service_directory" "simplead" {
  type = "SimpleAD"
  size = "Small"

  name       = local.simplead_fqdn
  short_name = "ad" # note: admin username then ad\administrator
  password   = local.envs["SIMPLEAD_ADMIN_PASSWORD"]

  vpc_settings {
    vpc_id     = module.vpc_ireland.vpc_id
    subnet_ids = module.vpc_ireland.public_subnets
  }

  provider = aws.ireland # won't work in frankfurt
}
Where does local.envs["SIMPLEAD_ADMIN_PASSWORD"] come from, I hear you ask?
Since it’s bad practice to commit sensitive data like passwords into source control (our Terraform specification for this project lives in a Git repository), we’ve stored the password we’re planning to use for the ad\administrator user in a .env file (duly .gitignored, of course)…
SIMPLEAD_ADMIN_PASSWORD=§up0rS3cretAd4dminPässwor&
…which is imported into a local value using this code snippet:
# import environment variables
# via https://stackoverflow.com/questions/59789730/how-can-i-read-environment-variables-from-a-env-file-into-a-terraform-script
locals {
  envs = { for tuple in regexall("(.*)=(.*)", file("${path.module}/.env")) : tuple[0] => sensitive(tuple[1]) }
}
Now, upon running terraform apply, AWS will take 5-10 minutes to provision two domain controllers and DNS servers (the DNS configuration will become important in a minute) for you. As usual with AWS-managed multi-AZ deployments, updates will be performed automatically in a manner that shouldn’t impact availability.
Pricing (as of September 2024): Assuming you haven’t used AWS directory services before, Simple AD will be free for the first month. After that, it’s roughly $40/month. It is, in fact, free in perpetuity if directly connected to WorkSpaces with at least one active user per month, but since we’ll use it in conjunction with AD Connector (where the same policy applies – so no costs there), AWS will charge those $40/month – which is still less than half the price of an AWS Managed Microsoft AD.
A small Windows EC2 instance for AD administration tasks
With Simple AD up and running, it’s time to test whether we can have have AWS automatically join an EC2 instance to it.
We’ll be needing such an instance for more than just testing, anyway: While it’s possible to create AD users within the Amazon WorkSpaces console – and for Managed Microsoft ADs newly in the AWS Management Console – those interfaces lack the functionality required for setting up a user equipped with the rights required to join future EC2 instances and WorkSpaces to the directory as needed within an AD Connector context. (We could use the ad\administrator user for this, but that’s bad practice.)
The first step is creating a key pair for the instance’s local administrator user (which we shouldn’t ever need to log into if the instance joins the AD successfully). I usually do this manually8 in the EC2 console under “Network & Security” > “Key Pairs”, making sure I’m in the correct Region. Here, in Ireland, I created a key pair called simplead-admin-server-keypair.
Then there’s the usual security group boilerplate, made a little bit less verbose by the terraform-aws-modules/security-group/aws module. As we’re planning to connect to this machine only via Fleet Manager Remote Desktop instead of standard RDP, no ingress rules are necessary. We could limit egress, but since we won’t install third-party software or surf the web on this server, we opted not to do so (for now).
# security group for ad admin server, allowing egress to anywhere
module "security_group_simplead_administration_server" {
  source  = "terraform-aws-modules/security-group/aws"
  version = "5.1.2"

  name        = "simplead-admin-server-sg"
  description = "Simple AD Admin Server Security Group"
  vpc_id      = module.vpc_ireland.vpc_id

  # allow all traffic out (and none in), by default to 0.0.0.0/0 and ::/0
  egress_rules = ["all-all"]

  providers = {
    aws = aws.ireland
  }
}
As for the disk image to bootstrap our instance with: the latest Windows Server 2022 AMI will do the trick.
# dynamically determine latest windows server 2022 base ami
data "aws_ami" "latest_windows_server_2022_base_ireland" {
  most_recent = true
  owners = ["amazon"]
  filter {
    name = "name"
    values = ["Windows_Server-2022-English-Full-Base-*"]
  }

  provider = aws.ireland
}
(Reminder in case you’ve become blind to it: Always add provider = aws.ireland to resources that relate to infrastructure in Ireland, even on a data source that merely retrieves an AMI ID like this.)
The Terraform definition of the EC2 instance itself is a little more involved – you’ll be familiar with most of the following arguments if you’ve set up EC2 instances using Terraform before…
# ad admin server
module "simplead_administration_server" {
  source  = "terraform-aws-modules/ec2-instance/aws"
  version = "5.6.1"

  name = "simplead-admin-server"

  ami                         = data.aws_ami.latest_windows_server_2022_base_ireland.id
  ignore_ami_changes          = true       # since we dynamically determine the latest windows ami, its id will change each month or so – so prevent terraform from thinking it needs to replace this instance each time that happens
  instance_type               = "t3.small" # bit sluggish, but enough
  vpc_security_group_ids      = [module.security_group_simplead_administration_server.security_group_id]
  subnet_id                   = module.vpc_ireland.public_subnets[0]
  key_name                    = "simplead-admin-server-keypair" # created manually in the ec2 console
  associate_public_ip_address = true

  # assign a 50gb c: drive
  root_block_device = [
    {
      encrypted   = true
      volume_type = "gp3"
      volume_size = 50
    },
  ]

  # set up an iam instance profile and grant permissions that
  # 1. enable the ssm agent to perform its tasks and
  # 2. allow the ssm agent to interact with directory services (so, join this instance to a directory)
  create_iam_instance_profile = true
  iam_role_description        = "IAM role for simplead_administration_server EC2 instance"
  iam_role_policies = {
    AmazonSSMManagedInstanceCore    = "arn:aws:iam::aws:policy/AmazonSSMManagedInstanceCore"
    AmazonSSMDirectoryServiceAccess = "arn:aws:iam::aws:policy/AmazonSSMDirectoryServiceAccess"
  }

  # powershell code for setting up ad management tooling components on server
  # via https://github.com/neillturner/terraform-aws-adclient/blob/master/main.tf
  # as user data, see https://docs.aws.amazon.com/AWSEC2/latest/UserGuide/user-data.html#ec2-windows-user-data
  # note that "<<-EOF" instead of "<<EOF" strips out leading tabs (but not spaces)
  user_data = <<-EOF
    <powershell>
      Install-WindowsFeature RSAT-ADLDS          # "AD LDS Snap-Ins and Command-Line Tools"
      Install-WindowsFeature RSAT-AD-PowerShell  # "Active Directory module for Windows PowerShell"
      Install-WindowsFeature RSAT-AD-Tools       # "AD DS and AD LDS Tools"
      Install-WindowsFeature RSAT-DNS-Server     # "DNS Server Tools"
      Install-WindowsFeature GPMC                # "Group Policy Management"

      # fix powershell not accepting keyboard input by installing current PSReadLine version
      # via https://repost.aws/questions/QUGfM8RX3bSaadv5P_8f6byg/i-am-unable-to-paste-text-or-type-while-using-fleet-manager-in-certain-windows
      Install-PackageProvider -Name NuGet -MinimumVersion 2.8.5.201 -Force
      Install-Module -Name PSReadLine -Force
    </powershell>
  EOF

  # dependency not necessary in practice during testing
  # yet: logically, an instance can't join to a directory that doesn't exist yet
  depends_on = [aws_directory_service_directory.simplead]

  providers = {
    aws = aws.ireland
  }
}
…but a couple words about the IAM instance profile and, in a minute, user_data are in order. From Amazon’s documentation:
An instance profile is a container that passes IAM role information to an Amazon Elastic Compute Cloud (Amazon EC2) instance at launch. You can create an instance profile for Systems Manager by attaching one or more IAM policies that define the necessary permissions to a new role or to a role you already created.
So this equips our instance with an IAM role that, given certain policy attachments, allows software running on that instance to access AWS services9 with permissions specified in those policies. In this case, as outlined in the inline comment above, attaching the AmazonSSMManagedInstanceCore policy to our IAM instance profile allows Amazon’s SSM Agent (which comes preinstalled on Amazon’s Windows AMIs) to perform its various functions, one of which – requiring the other AmazonSSMDirectoryServiceAccess policy – is seamlessly joining an instance to a domain.
The user_data argument contains a sequence of PowerShell commands executed by EC2Launch when the instance is initially launched (you could add <persist>true</persist> behind the closing </powershell> tag to have EC2Launch run these commands on each boot, which comes in handy in some contexts). These specific commands here install various Windows components for Active Directory administration. Also, we use NuGet to install the current ReadLine version (without which PowerShell won’t accept keyboard input when using Fleet Manager Remote Desktop).
Back to SSM Agent: Having granted it the permission to join this here instance to a directory is required but not sufficient: We need to let it know which directory to join the instance to. That’s done with a aws_ssm_document resource – basically a configuration file for SSM where we specify the directory ID, name, and IP addresses of the DNS servers, all of which can be pulled from the aws_directory_service_directory.simplead resource.
# ssm configuration to join ec2 instance to ad via ssm, via https://stackoverflow.com/a/63706452
resource "aws_ssm_document" "join_simplead" {
  name          = "join-simplead"
  document_type = "Command"
  content = jsonencode(
    {
      "schemaVersion" = "2.2"
      "description"   = "aws:domainJoin"
      "mainSteps" = [
        {
          "action" = "aws:domainJoin",
          "name"   = "domainJoin",
          "inputs" = {
            "directoryId"    = aws_directory_service_directory.simplead.id,
            "directoryName"  = aws_directory_service_directory.simplead.name,
            "dnsIpAddresses" = aws_directory_service_directory.simplead.dns_ip_addresses
          }
        }
      ]
    }
  )

  provider = aws.ireland
}

# associate the configuration with the instance
resource "aws_ssm_association" "join_simplead_administration_server" {
  name = aws_ssm_document.join_simplead.name
  targets {
    key    = "InstanceIds"
    values = [module.simplead_administration_server.id]

    # can also join based on a tag instead of a list of instance ids, see https://www.flypenguin.de/2021/10/18/aws---auto-join-windows-clients-to-a-managed-ad/
  }

  provider = aws.ireland
}
That’s it! After terraform apply and a few minutes (up to a quarter of an hour in my tests) of twiddling your thumbs waiting for EC2Launch to execute our PowerShell commands and SSM Agent to join the instance to the directory (and rebooting it at least once), you should be able to remote into the instance using Fleet Manager Remote Desktop. Upon logging in with the AD administration credentials – ad\administrator and the password from the .env file – you’ll be greeted with an “Other user” login screen. That means things worked! (If not, don’t fret: Down at the bottom of this post, you’ll find some pointers on debugging seamless AD join failures.)
Pricing (as of September 2024): The EC2 instance will set you back around $1.25/day, $0.99 of which is for the instance itself (which shrinks to zero when the instance isn’t running), with the 50 GB of block storage assigned to the C:\ drive costing $0.14. The remaining $0.12 can be explained by the public IP address associated with the instance (a little wasteful, but still cheaper than a NAT gateway).
Creating a directory user for AD Connector (…and, while you’re at it, your first WorkSpaces user)
With our administration instance up and running, it’s prime time to set up the aforementioned AD user with permissions to join future EC2 instances and WorkSpaces to the directory as required by AD Connector. While we could reuse the ad\administrator user for this, that’s bad practice.
As it just so happens, I won’t need to explain that here because AWS provides10 a handy step-by-step guide in the AD Connector docs. What’s not mentioned here is that the user’s password must be compliant with AWS password requirements, so keep that in mind.
(Note that this means you can’t just take the Terraform code from this post and terraform apply it from top to bottom – there’s this manual step in-between.)
Assuming you’ve followed these instructions and have created an AD user account (ad\adconnector, say – and make sure you uncheck the “User must change password at next logon” checkbox) that’s a member of the Connectors group, store its password in the .env file – we’ll need it in a bit.
SIMPLEAD_ADMIN_PASSWORD=§up0rS3cretAd4dminPässwor&
SIMPLEAD_ADCONNECTOR_SERVICE_ACCOUNT_PASSWORD=ÆnotherPässwor&That'sEv3nM0arSecre1
Before closing the connection to the AD administration server, feel free to already create a standard AD user (no non-default group memberships needed, but once again do make sure to uncheck the “User must change password at next logon” checkbox) for your first WorkSpace.
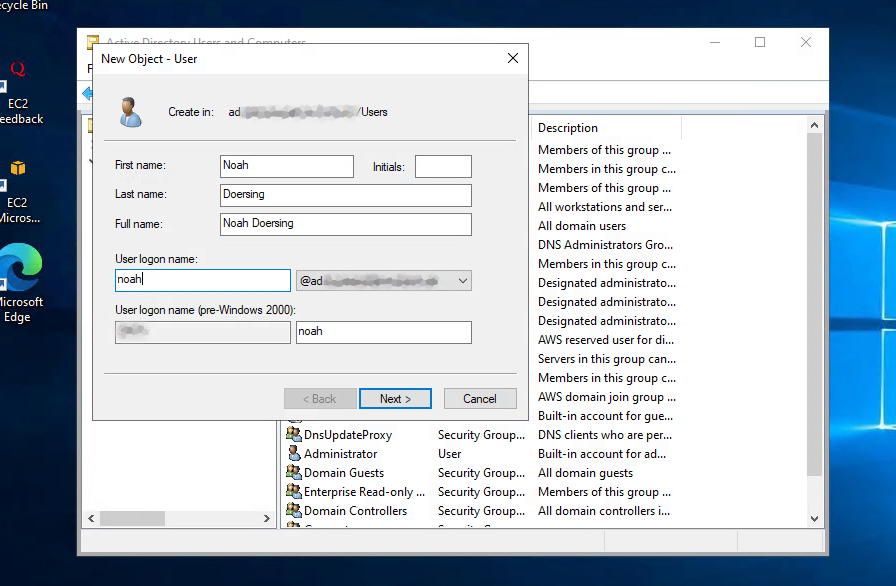
I’ve heard pictures drive engagement, so here, 3300ish words in, is a screenshot of the user creation modal for my noah user.
Letting the two VPCs talk to each other with a VPC peering connection
Before setting up AD Connector (let alone WorkSpaces), we need to connect the two VPCs in Frankfurt and Ireland. You won’t be surprised to learn that AWS offers a number of technologies for linking multiple VPCs together. If you’re dealing with a dense “network of networks”, a Transit Gateway might prove a more maintainable solution than a more basic and inexpensive VPC peering connection – utter overkill here, though. Quoting from the docs:
A VPC peering connection is a networking connection between two VPCs that enables you to route traffic between them […]. Instances in either VPC can communicate with each other as if they are within the same network. You can create a VPC peering connection between your own VPCs, or with a VPC in another AWS account. The VPCs can be in different Regions (also known as an inter-Region VPC peering connection).
Inter-Region VPC peering connection! Sounds like just the tool for the job.
[R]esources in the VPCs (for example, EC2 instances and Lambda functions) in different AWS Regions can communicate with each other using private IP addresses, without using a gateway, VPN connection, or network appliance. The traffic remains in the private IP address space. All inter-Region traffic is encrypted with no single point of failure, or bandwidth bottleneck. Traffic always stays on the global AWS backbone, and never traverses the public internet, which reduces threats, such as common exploits, and DDoS attacks.
Brilliant – where can I sign up?
Right within Terraform, of course, and the grem11n/vpc-peering/aws module makes the establishment of the VPC peering connection and the required routing table updates surprisingly painless.
module "vpc_peering_single_account_multi_region_main_ireland" {
  source  = "grem11n/vpc-peering/aws"
  version = "7.0.0"

  providers = {
    aws.this = aws
    aws.peer = aws.ireland
  }

  # important: vpc cidrs must be disjoint!
  this_vpc_id = module.vpc.vpc_id
  peer_vpc_id = module.vpc_ireland.vpc_id

  auto_accept_peering = true
}
One quick terraform apply later, any infrastructure in Frankfurt can now talk to the AD domain controllers in Ireland. Well, almost…
Extending the Simple AD security group to allow inbound traffic from Frankfurt
When setting up a Simple AD directory, AWS automatically creates a security group associated with the directory’s domain controllers and DNS servers. At the time of writing, this security group isn’t referenced11 from the “Directory details” page of your directory, so you’ll need to go hunting for it in the VPC dashboard: it’ll be named d-9367c582c5_controllers referencing your directory’s ID. During Simple AD creation, Terraform also captures the security group’s ID as aws_directory_service_directory.simplead.security_group_id, so you can also identify it that way.
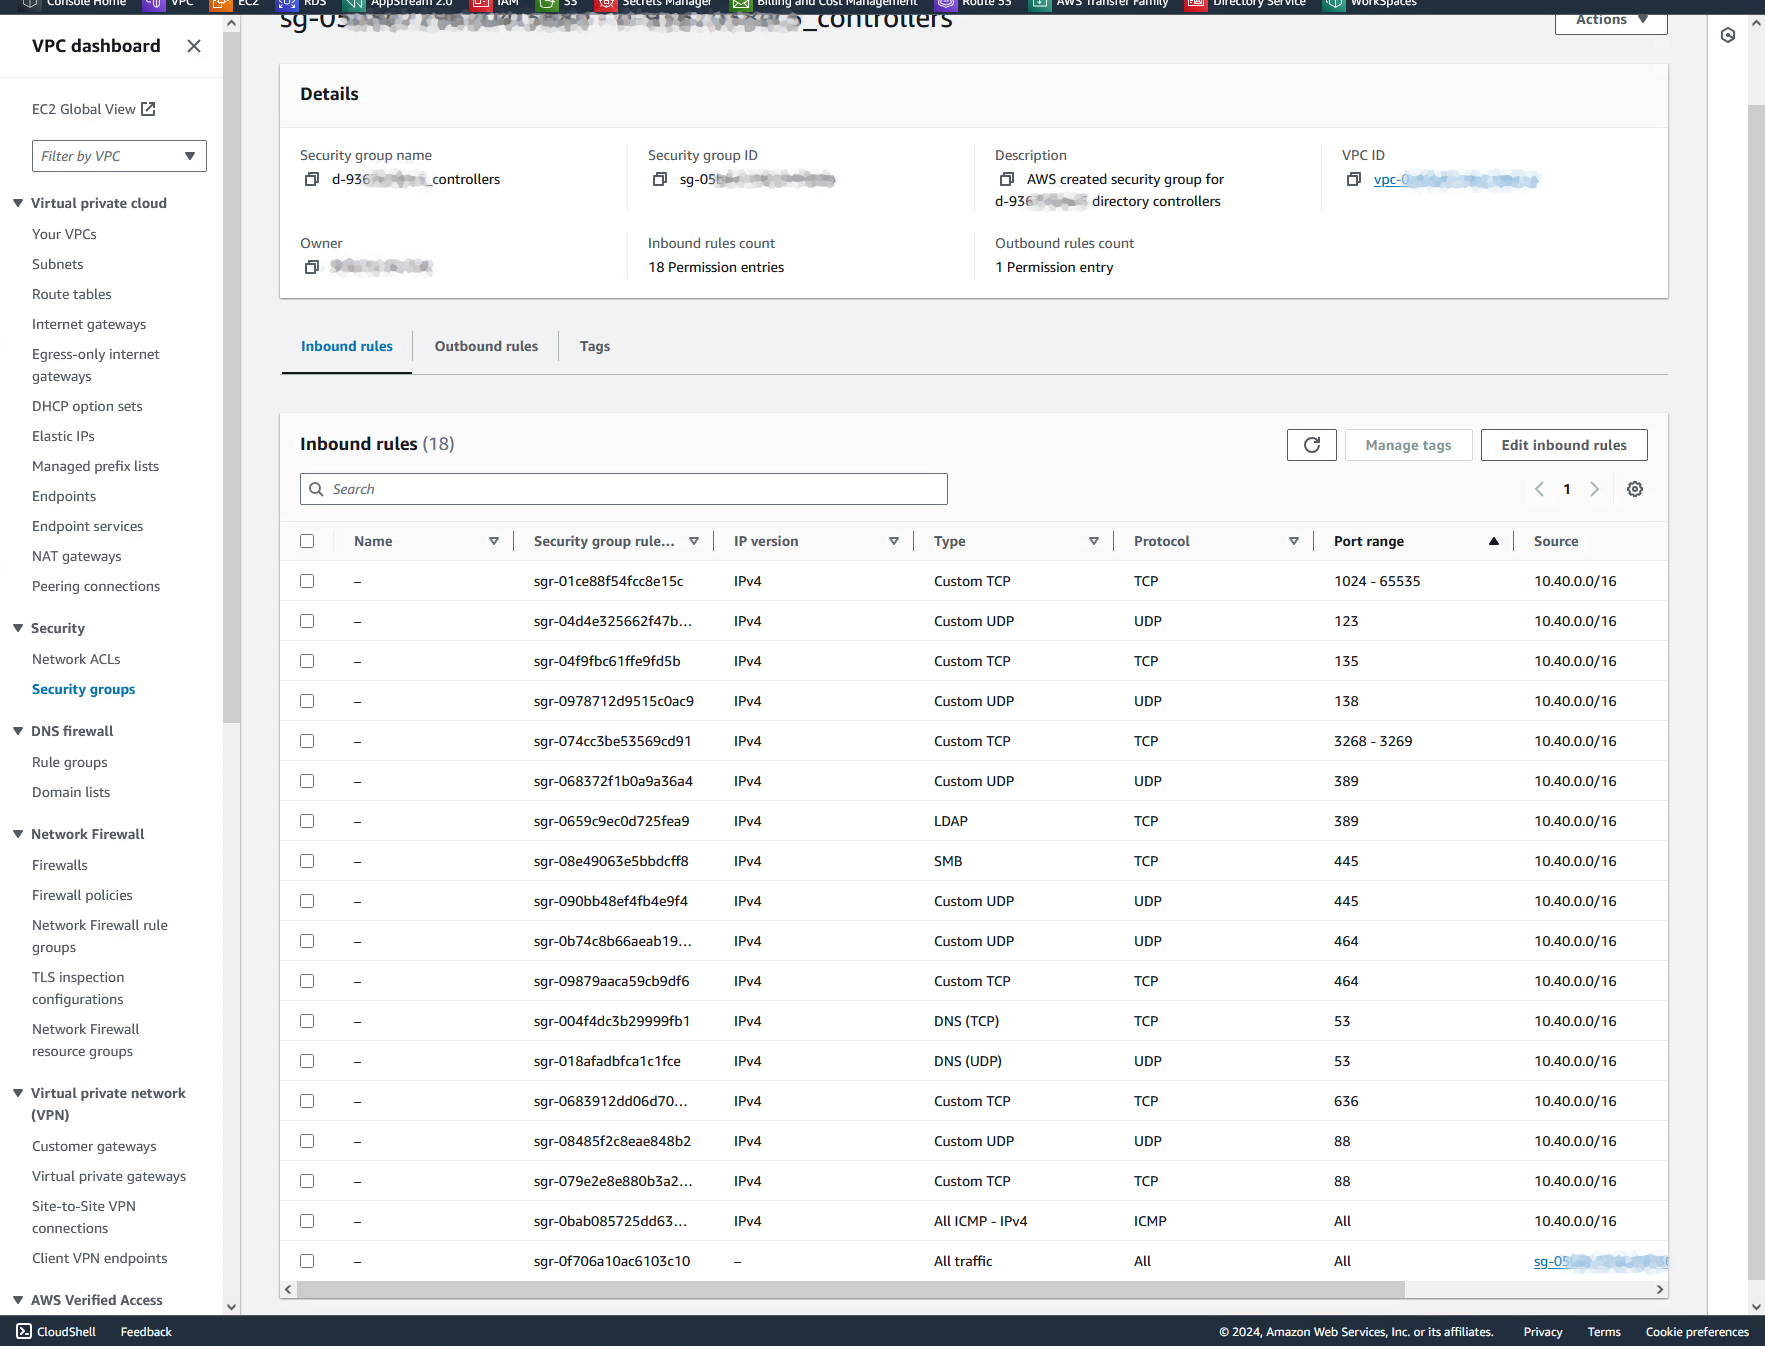
As you can see in the screenshot above, this security group permits access from the host VPC’s CIDR block to a plethora of ports of the directory servers (that’s because AD comprises a variety of services). So, with our VPC peering connection established, we’ll now need to extend the security group rules to also allow access from our network in Frankfurt in order for instances located there to communicate with the directory.
As far as I’m aware (…but I’m by no means an expert!), Terraform doesn’t provide a convenient way of retrieving existing security group rules, then duplicating them but with certain fields modified. So I just went through the inbound rules listed above and manually implemented them in Terraform. Again, the terraform-aws-modules/security-group/aws module makes this relatively painless, enabling me to specify the rules in a relatively dense and almost tabular manner instead of separate resources:
# create relevant security group rules to enable access from peered vpc in frankfurt
# can verify that you haven't missed any by sorting by port range in the aws management console
module "security_group_extensions_simplead_controllers" {
  source  = "terraform-aws-modules/security-group/aws"
  version = "5.1.2"

  create_sg         = false # because it already exists and isn't directly managed by terraform
  security_group_id = aws_directory_service_directory.simplead.security_group_id

  # define source cidr block (will be used in ingress_with_cidr_blocks below if none other given)
  ingress_cidr_blocks = [local.vpc_cidr]

  # rules (i added some descriptions)
  ingress_with_cidr_blocks = [
    {from_port =   -1, to_port =    -1, protocol = "icmp", description = "All ICMP"},
    {from_port =   53, to_port =    53, protocol = "tcp",  description = "DNS"},
    {from_port =   53, to_port =    53, protocol = "udp",  description = "DNS"},
    {from_port =   88, to_port =    88, protocol = "tcp",  description = "Kerberos Authentication"},
    {from_port =   88, to_port =    88, protocol = "udp",  description = "Kerberos Authentication"},
    {from_port =  123, to_port =   123, protocol = "udp",  description = "NTP"},
    {from_port =  135, to_port =   135, protocol = "tcp",  description = "RPC"},
    {from_port =  138, to_port =   138, protocol = "udp",  description = "NetBIOS Datagram Service"},
    {from_port =  389, to_port =   389, protocol = "tcp",  description = "LDAP"},
    {from_port =  389, to_port =   389, protocol = "udp",  description = "LDAP"},
    {from_port =  445, to_port =   445, protocol = "tcp",  description = "SMB"},
    {from_port =  445, to_port =   445, protocol = "udp",  description = "SMB"},
    {from_port =  464, to_port =   464, protocol = "tcp",  description = "Kerberos"},
    {from_port =  464, to_port =   464, protocol = "udp",  description = "Kerberos"},
    {from_port =  636, to_port =   636, protocol = "tcp",  description = "LDAPS"},
    #{from_port =  636, to_port =   636, protocol = "udp",  description = "LDAPS"},
    {from_port = 3268, to_port =  3269, protocol = "tcp",  description = "LDAP (Global Catalog)"},
    {from_port = 1024, to_port = 65535, protocol = "tcp",  description = "Various TCP"},  # contains previous entry, but i'm merely replicating what aws sets
  ]

  providers = {
    aws = aws.ireland
  }
}
You’d think it’d also be possible to, instead of granting access to the entire CIDR block of our VPC in Frankfurt, create a security group there, assign it to instances you want to join to the directory, and reference it instead of the CIDR block. While cross-VPC and even cross-account security group references are possible, cross-Region ones sadly won’t work:
You can’t reference the security group of a peer VPC that’s in a different Region. Instead, use the CIDR block of the peer VPC.
Can’t be helped.
You can verify that these rules have been successfully applied (and that VPC peering works) by trying to ping the IP address of one of your directory’s DNS servers (determine it by checking that value of aws_directory_service_directory.simplead.dns_ip_addresses[0] via terraform console, for example) from an existing instance12 in Frankfurt.
Routing AD DNS traffic from Frankfurt to Ireland with a Route 53 Resolver outbound endpoint (& sketches of alternate approaches)
Pinging the DNS servers is nice and all, but having DNS requests to various subdomains of ad.ourcooldomain.com (our Simple AD’s fully qualified domain name) delivered to them is required for many AD operations. In our VPC in Ireland, this seems to happen automatically (or at least it’s not an issue during seamless domain joins there), but in Frankfurt, we must first configure Amazon’s internal DNS resolution, called the Route 53 Resolver, to forward requests matching the AD’s FQDN to said DNS servers.
That’s required because sadly, AD Connector – which we’ll set up in the next section – doesn’t magically take care of this. (I’ve performed a number of tests where domain joins would fail due to retroactively-obvious13 DNS resolution issues.)
One potential approach to sort this out is creating a DHCP options set…
AWS recommends that you create a DHCP options set for your AWS Directory Service directory and assign the DHCP options set to the VPC that your directory is in. This allows any instances in that VPC to point to the specified domain and DNS servers to resolve their domain names.
…but that won’t work here: While simple, this method sends all DNS traffic in the relevant VPC to the DNS servers configured in the options set (here: the AD DNS servers). In Frankfurt, with DNS traffic thusly redirected to Ireland, this predictably breaks14 all kinds of things. And while the Simple AD DNS servers fall back to the Route 53 Resolver for anything they are not authoritative15 for, that’s Ireland’s Route 53 Resolver which of course isn’t aware of infrastructure in Frankfurt.
Instead, it’s possible to configure16 the Route 53 Resolver in Frankfurt to proxy only DNS queries for *ad.ourcooldomain.com over to the Simple AD DNS servers over in Ireland using an Outbound Endpoint while letting Amazon’s standard DNS resolution handle the rest as before.
(Note that Route 53 Resolver endpoints, while being a very “AWS-y” solution to this problem, are surprisingly expensive – so I’ll discuss an alternate solution a bit later.)
Any Route 53 Resolver endpoint requires you to set up (or reuse) a security group which, in the case of outbound endpoints, regulates which targets the endpoint can forward DNS requests to.
# security group for route 53 resolver outbound endpoint
module "security_group_ad_dns_outbound_endpoint" {
  source  = "terraform-aws-modules/security-group/aws"
  version = "5.1.2"

  name        = "ad-dns-outbound-endpoint-sg"
  description = "AD DNS Outbound Endpoint Security Group"
  vpc_id      = module.vpc.vpc_id

  # there's probably no reason to restrict outbound dns traffic (since targets are explicitly specified in rules later on), but do it anyway
  egress_cidr_blocks = [module.vpc_ireland.vpc_cidr_block]
  egress_with_cidr_blocks = [
    {from_port = 53, to_port = 53, protocol = "tcp"},
    {from_port = 53, to_port = 53, protocol = "udp"},
  ]
}
The endpoint itself, then, can be defined as follows, specifying whether to allow unencrypted and/or HTTPS-encrypted DNS requests as well as IPv4 and/or IPv6 addressing.
# route 53 resolver outbound endpoint for forwarding dns queries concerning ad fqdn to ad dns servers while keeping other dns queries as is
resource "aws_route53_resolver_endpoint" "ad_dns_outbound_endpoint" {
  name      = "ad-dns-outbound-endpoint"
  direction = "OUTBOUND"

  security_group_ids = [module.security_group_ad_dns_outbound_endpoint.security_group_id]

  dynamic "ip_address" {
    for_each = module.vpc.private_subnets
    content {
      subnet_id = ip_address.value
    }
  }

  # the construct above repeats the following for each private subnet (=index of module.vpc.private_subnets)
  #ip_address {
  #  subnet_id = module.vpc.private_subnets[0]
  #}

  protocols              = ["Do53"] # unencrypted only (all aws-internal anyway)
  resolver_endpoint_type = "IPV4"   # ipv4 (no need to ipv6 between frankfurt and ireland - again, all aws-internal anyway)
}
This allocates an IP address for the outbound endpoint in each private subnet (to save costs at the expense of some resiliency, you could – and, in this scenario, we actually did – constrain it to two subnets only).
With the outbound endpoint all set up, the redirection of DNS requests for ad.ourcooldomain.com (and subdomains thereof) now needs to be configured within a resolver rule associated with our endpoint:
resource "aws_route53_resolver_rule" "ad_dns_outbound_rule" {
  name                 = "simplead-dns-outbound-rule"

  rule_type            = "FORWARD"                                     # forward...
  domain_name          = aws_directory_service_directory.simplead.name # ...anything suffixed by this domain...

  resolver_endpoint_id = aws_route53_resolver_endpoint.ad_dns_outbound_endpoint.id # ...via this endpoint...

  # ...to these target dns servers
  dynamic "target_ip" {
    for_each = aws_directory_service_directory.simplead.dns_ip_addresses
    content {
      ip = target_ip.value
    }
  }
}

# associate rule with the vpc our outbound endpoint lives in
resource "aws_route53_resolver_rule_association" "simplead_dns_outbound_association" {
  resolver_rule_id = aws_route53_resolver_rule.ad_dns_outbound_rule.id
  vpc_id           = module.vpc.vpc_id
}
Running terraform apply should take less than five minutes.
Afterwards, similarly to how you earlier verified that the peering connection worked by pinging the directory servers from Frankfurt, you can now run nslookup ad.ourcooldomain.com on any preexisting EC2 instance in Frankfurt – if the outbound endpoint works correctly, this should now resolve instead of timing out.
Pricing (as of September 2024): Surprisingly17 expensive, as indicated previously. A Route 53 Endpoint costs $0.125/hour per ENI, i.e., for each ip_address { subnet_id = ... } block in the definition of your aws_route53_resolver_endpoint. Specifying just one ip_address block won’t work because, as with most full-managed services of this kind, AWS requires you to deploy Route 53 Endpoints in at least two subnets so that maintenance can be performed without downtime. So, times two, that’s $0.25/hour, which comes out to $180ish/month (plus negligible traffic charges).
For us, these costs aren’t a deal-breaker since this infrastructure isn’t meant to be permanent – but your mileage may vary. Hence:
Alternative: Roll your own DNS forwarding setup with Unbound
Whist writing this post, I came across an alternative in an old Server Fault answer: As outlined in an AWS Security Blog post from 2016 (that’s from before Route 53 Endpoints were a thing), it’s possible to set up Unbound, an open-source DNS resolver, on a tiny EC2 instance and configure it to implement essentially the same forwarding rule we defined above while routing any other requests to AWS-provided DNS. Server setup and configuration can be performed wholly with EC2 user data.
This instance (or, for resiliency, two instances – there’s no tricky synchronization requirements here, they’d be two independent and identical DNS forwarders) can then be referenced in a DHCP options set as mentioned earlier.
While I haven’t tested this solution (and it’s from far-gone 2016), I can’t think of a reason as to why it shouldn’t still work in 2024 and beyond.
(Not an) alternative: Attaching NS and Glue entries pointing at your AD DNS servers to your domain
Not being a DNS expert, I briefly tried to bodge together a DNS-based solution where I’d set up some subdomains, NS records and glue records to publicly delegate authority to ad.ourcooldomain.com to the AD DNS servers. After all:
For public domain names, Route 53 Resolver performs recursive lookups against public name servers on the internet.
I won’t detail all the variations I tried since this can’t work. That’s because – and I’m only 60% confident in the following explanation – the NS records for ad.ourcooldomain.com would need to resolve to the private IP addresses of the AD DNS servers, which the Route 53 Resolver, being located outside the VPC, can’t reach and thus also can’t recursively query.
(Apart from the fact that this idea went nowhere, it’d only work if you, in fact, set an existing domain whose DNS you control as your AD’s FQDN (which isn’t otherwise required), plus it’d leak the internal IP addresses of your AD DNS servers to the whole wide world, which – despite public access being locked out through security group rules – isn’t ideal to say the least.)
Enabling seamless domain joins (and WorkSpaces) in Frankfurt with AD Connector
With the Amazon-managed EC2 instances hosting the directory in Ireland now accessible via VPC peering and integrated into DNS resolution, we could now already manually join EC2 instances in Frankfurt to the AD.
But seamless joins of EC2 instances rely on AWS APIs to initialize the join, and in my testing, there’s no way of having those API calls reference a directory in a different Region. Similarly, WorkSpaces must be associated18 with a directory located in the same Region as those WorkSpaces.
While primarily designed to forge a connection to, say, an on-premises Microsoft Active Directory, AD Connector can of course also target directories hosted in other AWS Regions, and luckily for us, it supports Simple AD. This is not advertised or explicitly documented anywhere, as far as I can tell, but it “just works”.
I’m not sure exactly how AD Connector works under the hood, but from what I can gather, it functionally acts as a proxy:
AD Connector is a directory gateway with which you can redirect directory requests to your on-premises Microsoft Active Directory without caching any information in the cloud. […] When connected to your existing directory, all of your directory data remains on your domain controllers. AWS Directory Service does not replicate any of your directory data. […]
When you sign in to any AWS application or service integrated with an AD Connector (AWS IAM Identity Center included), the app or service forwards your authentication request to AD Connector which then forwards the request to a domain controller in your self-managed Active Directory for authentication. If you are successfully authenticated to your self-managed Active Directory, AD Connector then returns an authentication token to the app or service (similar to a Kerberos token).
Never mind how AD Connector works – it’s not going to work if we don’t set it up. So, having already created an ad\adconnector directory user with the permissions required by AD Connector earlier, it’s time to put it to work:
# ad connector in frankfurt, making ireland simple ad available there
resource "aws_directory_service_directory" "adconnector" {
  name     = aws_directory_service_directory.simplead.name               # must be identical to ad name in ireland
  password = local.envs["SIMPLEAD_ADCONNECTOR_SERVICE_ACCOUNT_PASSWORD"] # of service user we set up with domain join permissions
  size     = "Small"
  type     = "ADConnector"

  connect_settings {
    customer_dns_ips  = aws_directory_service_directory.simplead.dns_ip_addresses
    customer_username = "adconnector"                                                  # service user we set up with domain join permissions
    subnet_ids        = [module.vpc.private_subnets[0], module.vpc.private_subnets[1]] # at least two
    vpc_id            = module.vpc.vpc_id
  }

  # make sure not to create before dns set up correctly
  # (not actually required here just yet, but potentially for resources that transitively depend on this)
  depends_on = [aws_route53_resolver_rule_association.simplead_dns_outbound_association]
}
Once terraform apply has spent 5-7 minutes waiting for Amazon to set up the AD Connector (which automatically performs connectivity checks, failures of which you can debug as outlined in the docs), you should be good to go.
Pricing (as of September 2024): Identical to Simple AD – free if connected to WorkSpaces with at least one active user per month. Otherwise, it’s roughly $40/month.
Optionally, another EC2 instance for AD Connector testing (and maybe debugging)
To really make sure AD Connector works and our DNS forwarding shenanigans function correctly, I recommend setting up a small EC2 instance in Frankfurt and attempting to, as with the instance in Ireland, have SSM Agent perform a seamless domain join. (If you don’t run into any issues with that, you can terminate the instance again – but if you do run into issues, it’s nice to have a machine ready for debugging instead of trying to figure out potentially-cryptic WorkSpaces error messages.)
First create an EC2 key pair named adconnector-test-server-keypair in Frankfurt – then, add this code to your Terraform project (which is almost identical to the specification of the EC2 instance in Ireland, so, in a shocking turn of events, I don’t believe there’s any need for more exposition):
module "security_group_adconnector_test_server" {
  source  = "terraform-aws-modules/security-group/aws"
  version = "5.1.2"

  name        = "adconnector-test-server-sg"
  description = "AD Connector Test Server Security Group"
  vpc_id      = module.vpc.vpc_id

  egress_rules = ["all-all"]
}

data "aws_ami" "latest_windows_server_2022_base" {
  most_recent = true
  owners      = ["amazon"]
  filter {
    name   = "name"
    values = ["Windows_Server-2022-English-Full-Base-*"]
  }
}

module "adconnector_test_server" {
  source  = "terraform-aws-modules/ec2-instance/aws"
  version = "5.6.1"

  name = "adconnector-test-server"

  ami                    = data.aws_ami.latest_windows_server_2022_base.id
  ignore_ami_changes     = true
  instance_type          = "t3.small"
  vpc_security_group_ids = [module.security_group_adconnector_test_server.security_group_id]
  subnet_id              = module.vpc.private_subnets[0] # note: private subnet in frankfurt instead of public subnet in ireland, hence no associate_public_ip_address argument
  key_name               = "adconnector-test-server-keypair"

  root_block_device = [
    {
      encrypted   = true
      volume_type = "gp3"
      volume_size = 50
    },
  ]

  create_iam_instance_profile = true
  iam_role_description        = "IAM role for adconnector_test_server EC2 instance"
  iam_role_policies = {
    AmazonSSMManagedInstanceCore    = "arn:aws:iam::aws:policy/AmazonSSMManagedInstanceCore"
    AmazonSSMDirectoryServiceAccess = "arn:aws:iam::aws:policy/AmazonSSMDirectoryServiceAccess"
  }

  user_data = <<-EOF
    <powershell>
      Install-WindowsFeature RSAT-ADLDS          # "AD LDS Snap-Ins and Command-Line Tools"
      Install-WindowsFeature RSAT-AD-PowerShell  # "Active Directory module for Windows PowerShell"
      Install-WindowsFeature RSAT-AD-Tools       # "AD DS and AD LDS Tools"
      Install-WindowsFeature RSAT-DNS-Server     # "DNS Server Tools"
      Install-WindowsFeature GPMC                # "Group Policy Management"

      # fix powershell not accepting keyboard input by installing current PSReadLine version
      # via https://repost.aws/questions/QUGfM8RX3bSaadv5P_8f6byg/i-am-unable-to-paste-text-or-type-while-using-fleet-manager-in-certain-windows
      Install-PackageProvider -Name NuGet -MinimumVersion 2.8.5.201 -Force
      Install-Module -Name PSReadLine -Force
    </powershell>
  EOF

  depends_on = [aws_directory_service_directory.adconnector]
}

resource "aws_ssm_document" "join_adconnector" {
  name          = "join-adconnector"
  document_type = "Command"
  content = jsonencode(
    {
      "schemaVersion" = "2.2"
      "description"   = "aws:domainJoin"
      "mainSteps" = [
        {
          "action" = "aws:domainJoin",
          "name"   = "domainJoin",
          "inputs" = {
            "directoryId"    = aws_directory_service_directory.adconnector.id,
            "directoryName"  = aws_directory_service_directory.adconnector.name,
            "dnsIpAddresses" = aws_directory_service_directory.adconnector.dns_ip_addresses
          }
        }
      ]
    }
  )
}

resource "aws_ssm_association" "join_adconnector_test_server" {
  name = aws_ssm_document.join_adconnector.name
  targets {
    key    = "InstanceIds"
    values = [module.adconnector_test_server.id]
  }
}
The first time I terraform applyed this instance into existence (which, like the administration instance in Ireland, takes up to a quarter of an hour), the seamless domain join failed (i.e., I couldn’t log in with AD credentials and running the systeminfo command-line tool as the local administrator yielded Domain: WORKGROUP). A manual domain join worked out just fine, though, so I tried setting up the EC2 instance again without any changes19 and that time (and ever since), the seamless domain join succeeded. I’m not sure what to make of that other than it confirming a certain age-old adage of IT professionals.
So, if everything’s worked out, you can terminate this instance again. (If not, even after a retry: Down at the bottom of this post, you’ll find some pointers on debugging seamless AD join failures.)
That said, it’s a good “boilerplate-y” starting point for production EC2 instances you wish to join to your directory.
Registring the directory with WorkSpaces
We’ve almost reached the goal (which, if you’ve lost track, 6500ish words removed from the title and all, is setting up a WorkSpace in Frankfurt that’s joined to the Simple AD in Ireland). But first:
To allow WorkSpaces to use an existing AWS Directory Service directory, you must register it with WorkSpaces. After you register a directory, you can launch WorkSpaces in the directory.
And even “firster”:
Before you can register a directory using [Terraform], you must verify that a role named
workspaces_DefaultRoleexists. This role is created by the Quick Setup or if you launch a WorkSpace using the AWS Management Console, and it grants Amazon WorkSpaces permission to access specific AWS resources on your behalf.
If you’ve previously experimented with WorkSpaces in the same AWS account, this role may already exist. If not, though, you can easily create it with Terraform, then attach the relevant20 AWS managed policies:
# workspaces_DefaultRole role (required before doing workspaces stuff via api/tf)
# https://docs.aws.amazon.com/workspaces/latest/adminguide/workspaces-access-control.html#create-default-role
data "aws_iam_policy_document" "workspaces" {
  statement {
    actions = ["sts:AssumeRole"]
    principals {
      type        = "Service"
      identifiers = ["workspaces.amazonaws.com"]
    }
  }
}
resource "aws_iam_role" "workspaces_default" {
  name               = "workspaces_DefaultRole"
  assume_role_policy = data.aws_iam_policy_document.workspaces.json
}
resource "aws_iam_role_policy_attachment" "workspaces_default_service_access" {
  role       = aws_iam_role.workspaces_default.name
  policy_arn = "arn:aws:iam::aws:policy/AmazonWorkSpacesServiceAccess"
}
resource "aws_iam_role_policy_attachment" "workspaces_default_self_service_access" {
  role       = aws_iam_role.workspaces_default.name
  policy_arn = "arn:aws:iam::aws:policy/AmazonWorkSpacesSelfServiceAccess"
}
resource "aws_iam_role_policy_attachment" "workspaces_default_pool_service_access" {
  role       = aws_iam_role.workspaces_default.name
  policy_arn = "arn:aws:iam::aws:policy/AmazonWorkSpacesPoolServiceAccess"
}
Another step you should perform before registering your directory for use with WorkSpaces is setting up a security group for your WorkSpaces instances – that’s because such a security group should be specified during the registration stage. It can be switched out for a different one later, but, quoting from Amazon’s documentation:
You can add a default WorkSpaces security group to a directory. After you associate a new security group with a WorkSpaces directory, [only] new WorkSpaces that you launch or existing WorkSpaces that you rebuild will have the new security group.
If you don’t specify a security group, Amazon will auto-generate one (it’ll, in fact, always auto-generate one but that one won’t be used if you specify your own) whose name consists of the directory identifier followed by _workspacesMembers and which AWS warns against modifying.
Interestingly enough, to enable clients to initiate a connection to your WorkSpaces, you’ll need to add inbound rules for PCoIP and Amazon’s WSP protocol to your security group. This isn’t documented anywhere (I figured it out by trial and error and later found a relevant re:Post question and answer) and these rules also aren’t automatically attached to the auto-generated _workspacesMembers security group, which is a bit puzzling.
Anyway, enough yapping – here’s the code:
module "security_group_workspaces" {
  source  = "terraform-aws-modules/security-group/aws"
  version = "5.1.2"

  name   = "workspaces-sg"
  vpc_id = module.vpc.vpc_id

  # can constrain this depending on what your workspaces need to access (plus you can reference this security group in other security group rules, of course)
  egress_rules = ["all-all"]

  # might be able to restrict this https://docs.aws.amazon.com/workspaces/latest/adminguide/workspaces-port-requirements.html#network-interfaces
  # also compare https://docs.aws.amazon.com/workspaces/latest/adminguide/architecture.html
  ingress_cidr_blocks = ["0.0.0.0/0"]

  # allow inbound traffic via the two streaming protocols supported by workspaces: pcoip, wsp
  # note that this is required (tried without and couldn't connect to workspaces), yet not documented
  # see also: https://repost.aws/questions/QUQ1brLyutQPiTPKZMj0yXSg/can-t-access-my-personal-workspace-from-any-client
  ingress_with_cidr_blocks = [
    {from_port = 4172, to_port = 4172, protocol = "tcp",  description = "PCoIP"},
    {from_port = 4172, to_port = 4172, protocol = "udp",  description = "PCoIP"},
    {from_port = 4195, to_port = 4195, protocol = "tcp",  description = "WSP"},
    {from_port = 4195, to_port = 4195, protocol = "udp",  description = "WSP"},
  ]
}
After this rather lengthy prelude, registering your AD Connector with WorkSpaces works as follows. Note that you can configure certain settings for all WorkSpaces you’ll create in your directory during this step – e.g., which client applications can connect to your WorkSpaces, whether your users can resize their WorkSpaces by themselves, and others. I recommend taking a look at the documentation of the aws_workspaces_directory Terraform resource and also the relevant Amazon docs.
resource "aws_workspaces_directory" "adconnector" {
  directory_id = aws_directory_service_directory.adconnector.id
  subnet_ids   = aws_directory_service_directory.adconnector.connect_settings[0].subnet_ids

  self_service_permissions {
    change_compute_type  = false
    increase_volume_size = false
    rebuild_workspace    = false
    restart_workspace    = true
    switch_running_mode  = false
  }

  # steer which client software your users can access workspaces through
  # for this example, just allow macos (i.e. osx)
  workspace_access_properties {
    device_type_android    = "DENY"
    device_type_chromeos   = "DENY"
    device_type_ios        = "DENY"
    device_type_linux      = "DENY"
    device_type_osx        = "ALLOW"
    device_type_web        = "DENY"
    device_type_windows    = "DENY"
    device_type_zeroclient = "DENY"
  }

  workspace_creation_properties {
    custom_security_group_id = module.security_group_workspaces.security_group_id
    # can also change the ou workspaces will be created in via default_ou
    enable_internet_access              = false # since we use a nat gateway in our vpc
    enable_maintenance_mode             = true  # true = automatic weekly windows updates, see https://docs.aws.amazon.com/workspaces/latest/adminguide/workspace-maintenance.html
    user_enabled_as_local_administrator = false # no way!
  }

  # can also restrict access to workspaces based on ip groups, see https://registry.terraform.io/providers/hashicorp/aws/latest/docs/resources/workspaces_ip_group

  # make sure directory is not registered before iam role set up
  depends_on = [aws_iam_role_policy_attachment.workspaces_default_service_access]
}
With that, we’re ready to set up…
A first WorkSpace
Assuming the directory was successfully registered with WorkSpaces, now it’s almost trivially easy to set up a WorkSpace for your first user – which, if you followed my instructions, you’ve already created earlier after setting up the service user for AD Connector. If you haven’t, now’s the time!
Note that WorkSpaces, somewhat differently from EC2 instances and AMIs, bundle the compute configuration – CPUs and RAM – with disk images and a streaming protocol (industry-quasi-standard PCoIP or Amazon’s own WSP, which may not be a coin toss depending on your needs) and, in the case of Windows, whether to preinstall a license-included Microsoft Office distribution or not. Such a bundle is called a, uh, bundle:
A WorkSpace bundle is a combination of an operating system, and storage, compute, and software resources [and streaming protocol]. When you launch a WorkSpace, you select the bundle that meets your needs. The default bundles available for WorkSpaces are called public bundles.
(Once you’ve got a WorkSpace up and running, you can – after installing software for your users – snapshot it to create a custom bundle which can then be deployed on further WorkSpaces.)
You can browse available bundles in the WorkSpace setup flow in the WorkSpaces Console – try it and note down the bundle ID(s) you wish to try out. (Note that if you change your mind later, you can – if certain conditions are met – migrate to another bundle while retaining user data.)
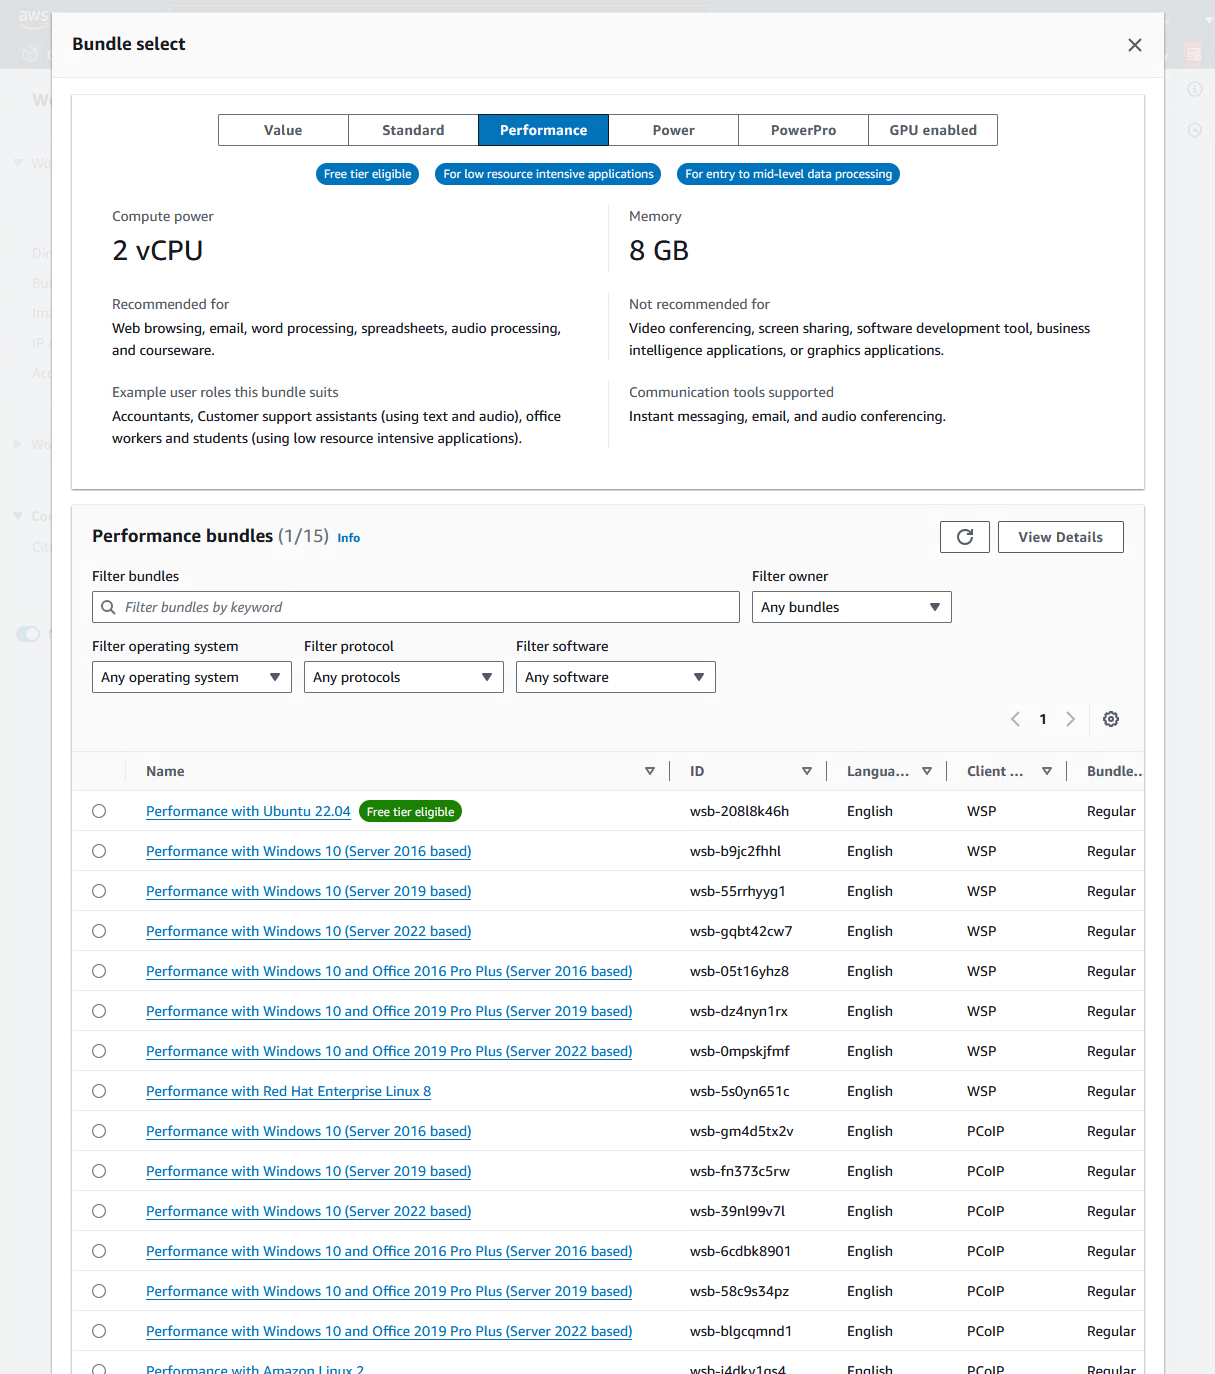
While you can use the aws_workspaces_bundle resource to dynamically determine bundle IDs based on names, I advise against doing that: at the time of writing, there’s no option to specify the desired streaming protocol this way. However, WorkSpace bundle IDs don’t change frequently (unlike EC2 image IDs), meaning that they’re relatively stable. I like to give them names as follows:
data "aws_workspaces_bundle" "standard_server_2022_wsp" {
    bundle_id = "wsb-93xk71ss4" # "Standard with Windows 10 (Server 2022 based)", WSP
}
Then, a WorkSpace using my noah user created earlier can be set up like this:
resource "aws_workspaces_workspace" "noah_workspace_image" {
  directory_id = aws_workspaces_directory.adconnector.directory_id
  # could also reference aws_directory_service_directory.adconnector.id instead but then there's no terraform dependency between workspace and the directory registration, leading to issues on terraform apply/destroy

  bundle_id = data.aws_workspaces_bundle.standard_server_2022_wsp.bundle_id
  user_name = "noah"

  # since bitlocker encryption is not supported on workspaces, you can encrypt volumes using aws kms keys
  # this has drawbacks, though, so take a look at the docs to make an informed decision
  # https://docs.aws.amazon.com/workspaces/latest/adminguide/encrypt-workspaces.html
  root_volume_encryption_enabled = false
  user_volume_encryption_enabled = false

  # other options, see https://registry.terraform.io/providers/hashicorp/aws/latest/docs/resources/workspaces_workspace.html
  # in my testing, there seems to be a bug (?) where you have to either set values for all these arguments or leave this block out completely
  workspace_properties {
    compute_type_name                         = "STANDARD"
    user_volume_size_gib                      = 20
    root_volume_size_gib                      = 80
    running_mode                              = "AUTO_STOP" # or "ALWAYS_ON"
    running_mode_auto_stop_timeout_in_minutes = 60
  }
}
In my experience, it takes about 10-12 minutes for terraform apply to deploy the WorkSpace and join it to your Simple AD. Afterwards, you can log in using the client application of your choice (assuming you’ve enabled it during directory registation).
Pricing (as of September 2024): Depends on the bundle and whether a given WorkSpace was set up with monthly or usage-based billing (via the running_mode argument). Expect $50-$100 per month for relatively standard configurations. Little bit more with Microsoft Office, little bit less with Linux instead of Windows. A lot more if you go for “GPU-enabled” configurations.
It works!
Go download the WorkSpaces client for the platform you’re using and log in using your registration code (which is the same for all WorkSpaces authenticated against a given directory, see aws_workspaces_directory.adconnector.registration_code or in the AWS Management Console) and AD user credentials.
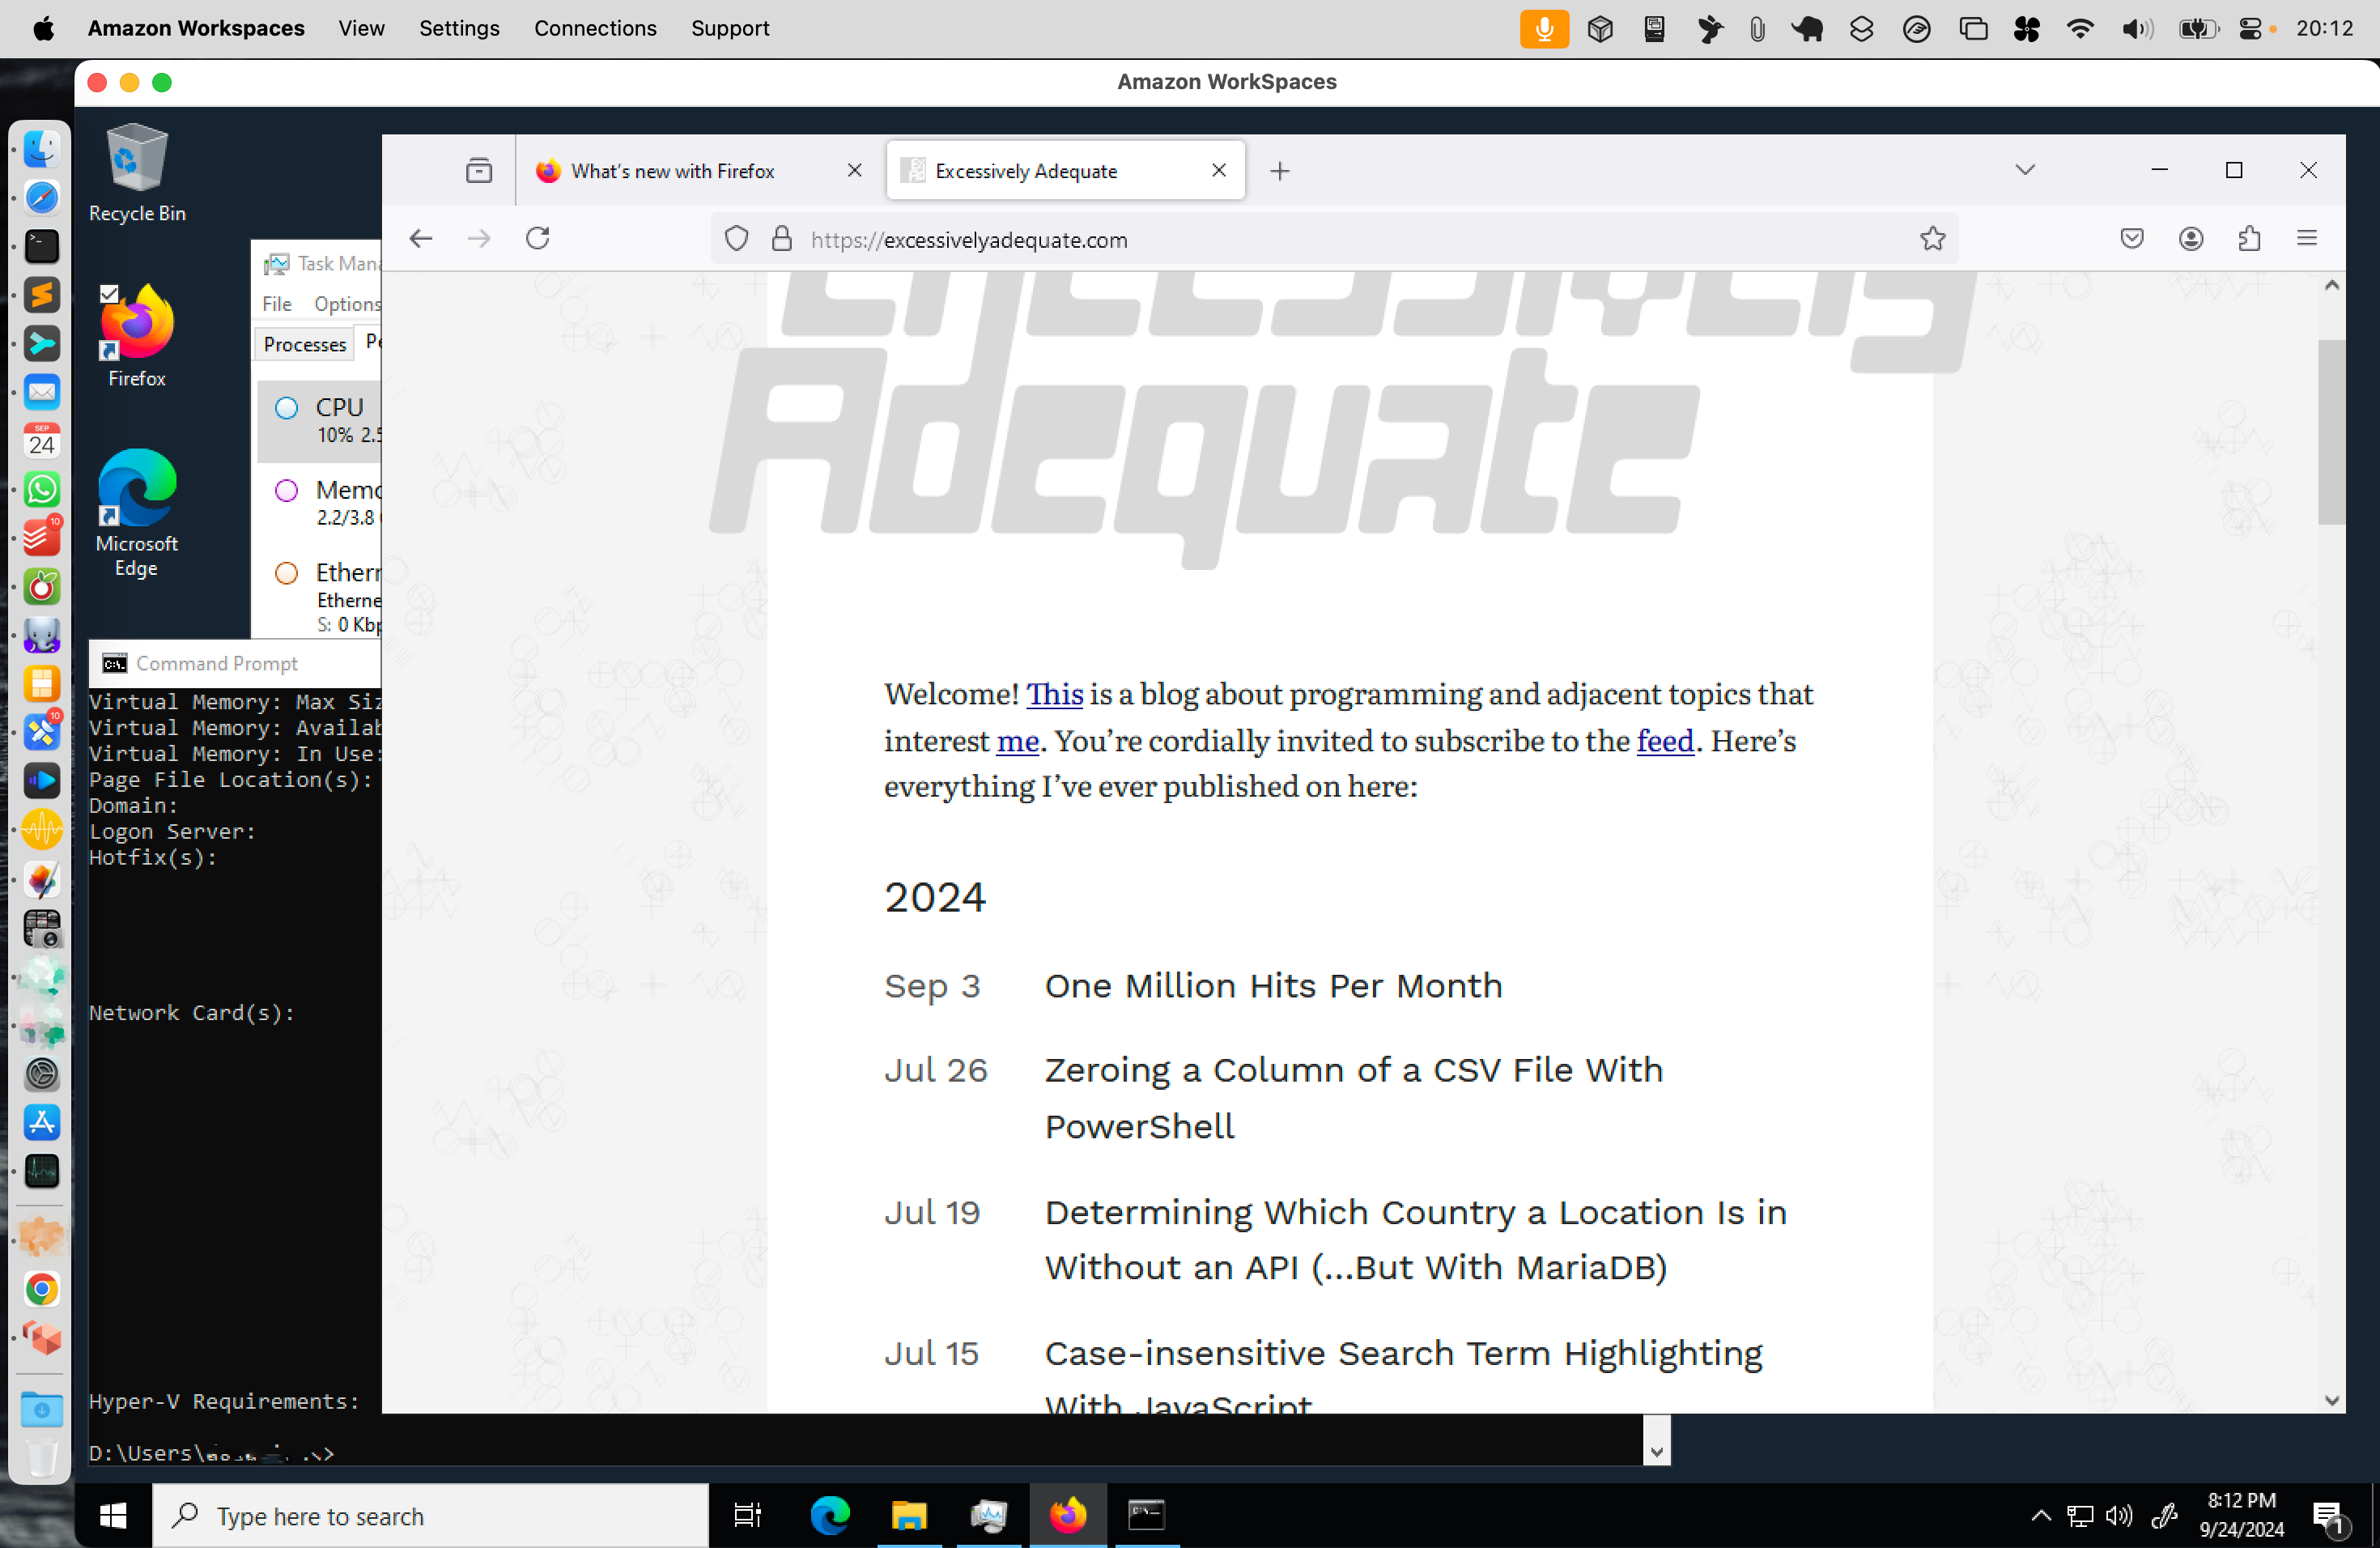
This website displayed in Firefox running on a WorkSpace accessed through Amazon’s WorkSpaces client for macOS.
So there you go, a WorkSpace in Frankfurt managed21 by a Simple AD in Ireland. Not necessarily cost-effective (largely due to the Route 53 Resolver endpoint required for proper DNS routing – though, as mentioned, there’s cheaper alternatives), but it functions just swell.
Did that warrant 8000ish words, though? Who22 knows, but I hope you’ve learned a thing or three. I know I have.
Appendix: A non-exhaustive set of pointers for debugging seamless AD join failures
As promised earlier, here’s a few23 seamless AD join failure scenarios I encountered during work on this project, with tips on how to figure out what’s wrong and on approaches for finding your way toward a solution.
Generally, it’s a good idea to familiarize yourself with Microsoft’s Active Directory domain join troubleshooting guidance. Make sure to also take a look at Amazon’s Knowledge Center article on this topic – it lists common reasons why a seamless domain join on AWS might fail and how to resolve the underlying issue in each case.
Checking whether the join failed
At the most basic level, knowing what indicates a failed directory join is an important first step.
-
If you can’t RDP into a freshly–created instance using the
ad\administratorcredentials, chances are the join didn’t work out. It’s technically also possible that the join initially succeeded but connectivity was lost since then, though. -
After a successful login with the local administrator account (you’ll need the relevant EC2 keypair for this), open PowerShell and run
systeminfo. This command takes a few seconds to gather information, then prints out a list of information about your24 machine. The line starting with “Domain:” contains either your directory’s FQDN (likead.ourcooldomain.com) – indicating a successful join – orWORKGROUP, which is the default on computers not joined to a domain. -
Alternatively, run
%SystemRoot%\system32\control.exe sysdm.cplto open the “System Properties” dialog box, select the “Computer Name” tab, then look at the name displayed next to “Workgroup:”.
Where to look for error messages
There’s several places where you can find hints as to what went wrong during the domain join:
-
The first step in debugging the underlying issue is checking the log events25 created during the join attempt by Amazon’s software. Navigate to the relevant section in Event Viewer: “Application and Services Logs” > “EC2ConfigService”.
There, you should see a list of events in reverse-chronological order, usually culminating in an “Error” event, commonly surrounded by warnings. Take a look at the details of these and immediately preceding “Information” events – this tells you at which stage the failure occurred.
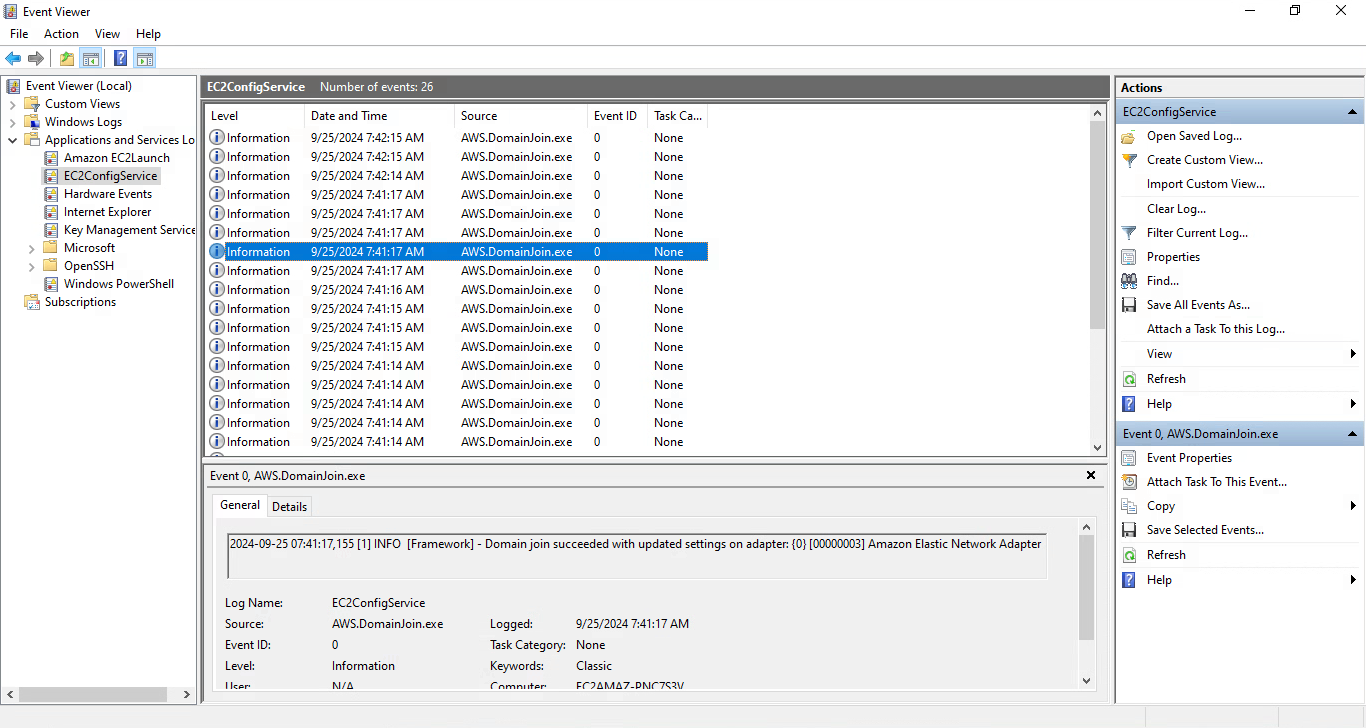
A successful seamless AD join’s entries in Event Viewer – what you want to see.
-
For further details on which step of the domain join failed and why, it’s often illuminating to read through
C:\Windows\debug\NetSetup.LOG– Windows details the entire process of joining the domain in this file. In the documentation, you’ll find a list of common error codes and what to do about them. -
Attempting a manual domain join produces detailed error messages that, in my experience, tend to be more immediately helpful than what’s logged to
NetSetup.LOG, so it’s worth a shot if you’re not getting anywhere. (It’s also possible that a manual domain join succeeds when a seamless one didn’t.)
Scenario I – AD Connector cannot be created
Amazon provides a port test application designed to aid in debugging failures when setting up AD Connector:
Download and unzip the
DirectoryServicePortTesttest application. The source code and Visual Studio project files are included so you can modify [it] if desired. […] This test app determines if the necessary ports are open from the VPC to your domain, and also verifies the minimum forest and domain functional levels.
Also double-check that the AD Connector prerequisites are met in your scenario.
Scenario II – Join not initiated due to missing IAM policy or SSM document
If you forgot to add the rn:aws:iam::aws:policy/AmazonSSMDirectoryServiceAccess policy to your instance’s IAM instance profile or haven’t associated the aws:domainJoin SSM document defined above with your instance, the join may not be attempted to begin with (which results not a whole lot being logged, leaving you scratching your head).
Scenario III – DNS resolution failures
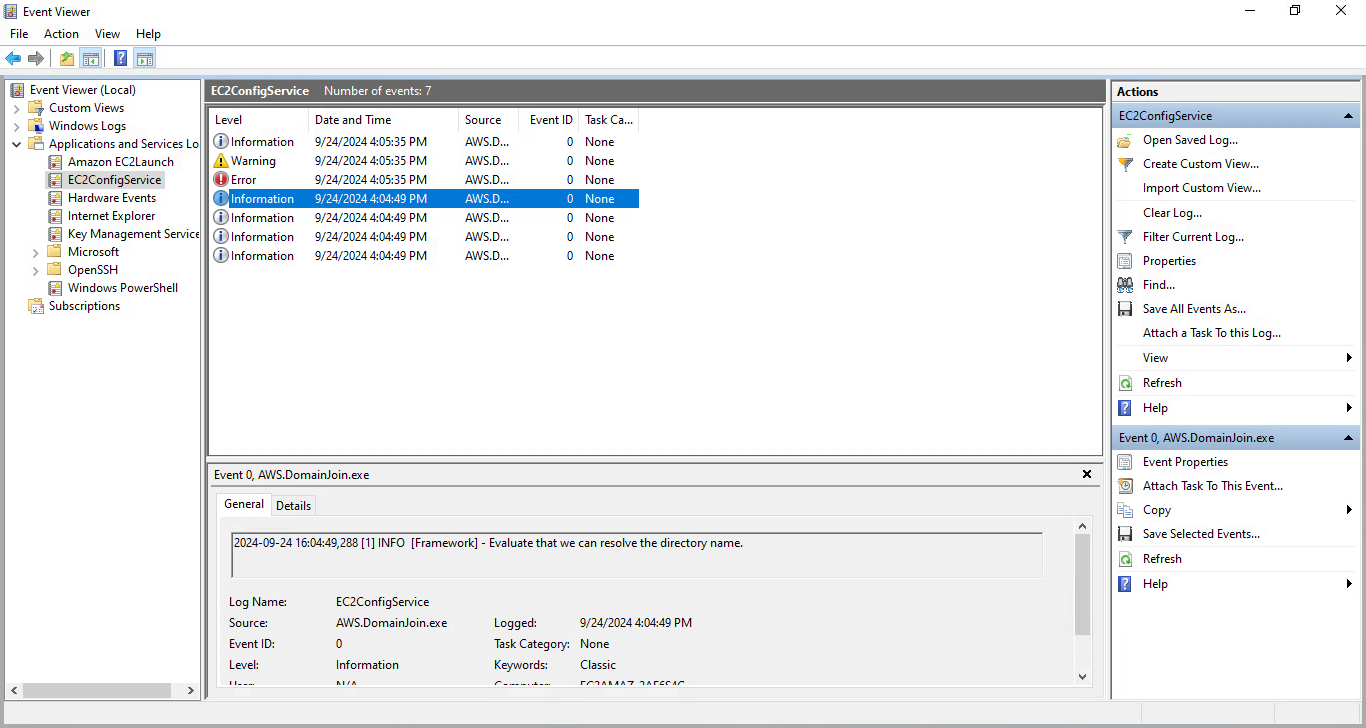
If the Route 53 outbound endpoint (or some custom DNS redirection setup) routes DNS queries incorrectly or you haven’t set up redirection of AD-related DNS queries to your AD DNS servers to begin with, you’re going to be presented with an error right after the “Evaluate that we can resolve the directory name” step:
When attempting a manual join in this scenario, the error message should tell you which subdomain couldn’t be resolved and what DNS server was queried for it:

To eliminate the possibility of closed ports (or VPC peering problems, though I haven’t had any of those) causing your DNS issues, you can configure Windows to directly query the Simple AD DNS servers by their IP addresses, after which a manual join should succeed:
- Open the start menu and type
ncpa.cplto open the “Network Connection” section of Control Panel. - Right-click the “Ethernet 3” network adapter (it might be named differently, but there should only be one) and select “Properties”.
- Double-click the “Internet Protocol Version 4” list entry.
- Select “Use the following DNS server addresses” and change the “Preferred DNS server” and “Alternate DNS server” addresses to the IP addresses of your Simple AD DNS servers.
- Choose “OK”.
If you’re confident that DNS forwarding works correctly in principle, make sure that the security group associated with your Simple AD allows inbound TCP and UDP traffic on port 53. Conversely, your EC2 instance’s security group must allow outbound TCP and UDP traffic on port 53.
Note: As an alternative to venerable old nslookup, you can use the Resolve-DnsName PowerShell cmdlet to test DNS resolution. For example, Resolve-DnsName ad.ourcooldomain.com tries to resolve that subdomain using the default options, while Resolve-DnsName ad.ourcooldomain.com -Server 10.0.42.42 queries that DNS server accordingly. Supply an argument like -Type A to specifically query for A records (and analogous for CNAME, NS etc.).
Scenario IV – AD Connector user doesn’t have the correct permissions
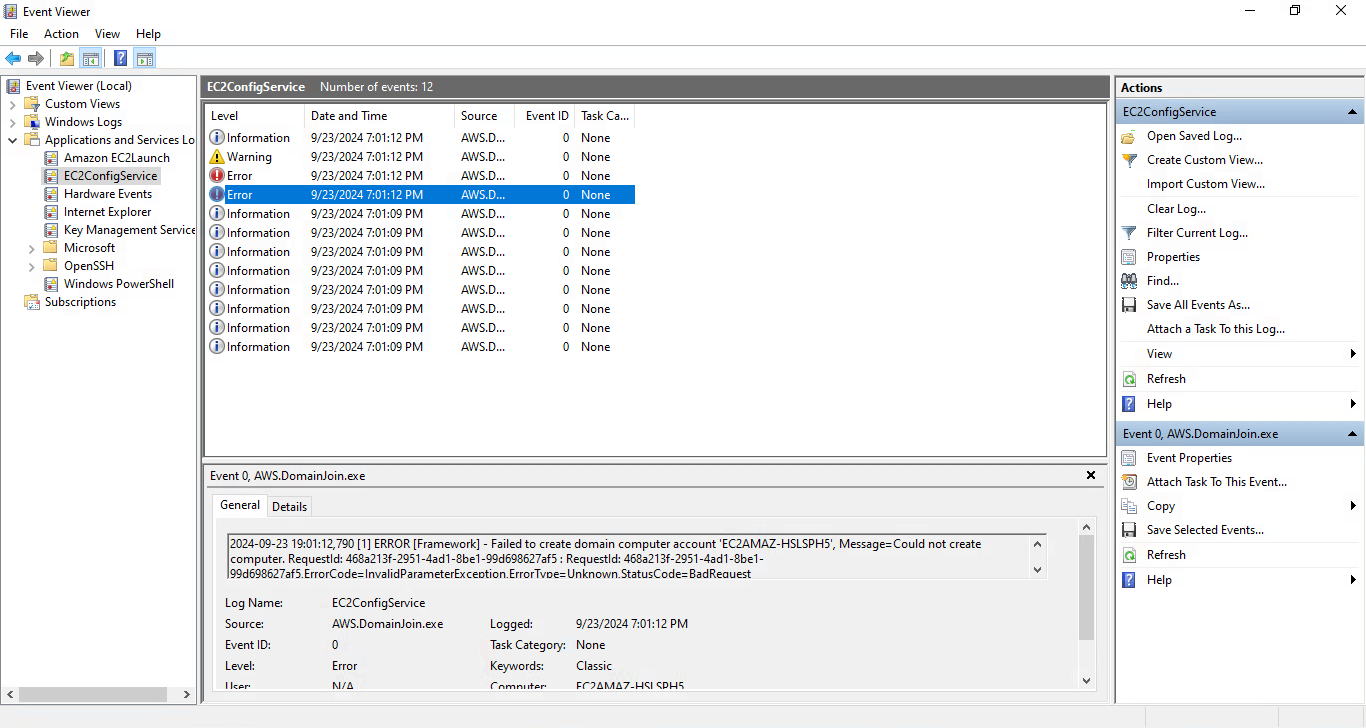
On a test run just prior to publishing this post, I had forgotten to add the ad\adconnector user to the Connectors group. This resulted in an error as shown below.
Simply fixing that group membership oversight and recreating the EC2 instance allowed the seamless join to succeed.
Scenario V – Join failure after computer account creation (DNS issues)
At some point, I had defined an A record on our AD’s FQDN referencing one of the Simple AD DNS servers. This had the effect of letting the seamless join progress a little further than before – a computer account was created in the directory before faulty DNS resolution of subdomains of ad.ourcooldomain.com brought the process to a standstill with an error code 0x54b.
So keep in mind that successful creation of a computer account doesn’t preclude the possibility of a DNS misconfiguration.
-
Knock on wood. ↩
-
And plenty of documentation. And, of course, multiple layers of backups – infrastructure’s not all that useful if there’s no data flowing through it. ↩
-
WorkSpaces itself also isn’t universally available, but it is in Frankfurt. ↩
-
Being nerd sniped may have played a role in all this. ↩
-
Please appreciate my restraint in not referencing the title of the second Lord of the Rings movie’s. (Welp.) ↩
-
A few notes on using third-party Terraform modules: 1. Always read the code, both for security reasons (even a 1000-star GitHub repo can be compromised) and to learn stuff – perhaps what you’re trying to do is so simple that it’d make more sense to just, uh, raw dog the relevant
resources; 2. pin the module version for stability and, again, security reasons; and 3. set yourself a regular reminder to check for updates (also of Terraform itself and any providers you use). ↩ -
Now that’s some professional network topologizin’! ↩
-
Instead of by uploading a self-generated public key to AWS using Terraform. ↩
-
You could, say, define and attach a policy that grants read permissions for an S3 bucket, which would then be accessible from that instance (e.g., with Cyberduck – see the “S3 (Credentials from Instance Metadata) connection profile” configuration) without further authentication. ↩
-
It’s mentioned in the documentation, though, and making changes to it isn’t discouraged all that harshly. ↩
-
As long as that instance’s security group allows outbound ICMP. ↩
-
Not being deeply familiar with how Active Directory works had me scratching me head for a while there! ↩
-
I’ve tried and, for starters, couldn’t remote into EC2 instances anymore, leading me to quickly revert this change. ↩
-
Here’s a good primer on the Route 53 Resolver and what’s possible with endpoints. ↩
-
A cursory search for implementation details regarding Route 53 Endpoints didn’t get me very far as to why this conceptually-simple feature costs so much. But I assume, considering the alternative outlined further down, that AWS sets up a set of “EC2-instance-shaped” DNS servers that implement your forwarding rules, which are likely dimensioned for far larger workloads than what’s required here. ↩
-
Before you can create individual WorkSpaces instances, a directory must be registered for use with WorkSpaces. ↩
-
“The definition of insanity is doing the same thing over and over again expecting different results”, but if that ends up working, doesn’t that mean our computers are insane? (No, complex systems just interact in inconsistent ways which (along with the fact that we can make such systems from rocks and lightning) is amazing but occasionally annoying. (I’ll stop short of turning this footnote into a John Green video coercing nigh-randomness into beautiful metaphors for the human condition. Which is a type of John Green video I enjoy immensely. But this is supposed to be a technical blog post, dang it.)) ↩
-
We won’t need the last one, but without it, you might run into issues later on if you decide to explore WorkSpaces Pools. ↩
-
“Managed” since even (as opposed to Microsoft Managed AD) with Simple AD, group policies function – at least in a limited way. I haven’t explored what those limitations are in depth, but rolling out environment variables works, for one. ↩
-
In retrospect, I, for one, am not convinced, but having already written those words, I might as well hit publish (actually
git commit && git push– if you’re still receptive to input after all this waffling, you can read about how I deploy this blog here). ↩ -
AD joins are somewhat complex (especially if the directory servers, as is the case here, are located in a different part of the world as the rest of your infrastructure), so I’m sure there’s many kinds of failure scenarios I was lucky enough to avoid here. (And, conversely, many I encountered that you’ll be skilled enough to know how to circumvent in your sleep.) ↩
-
systeminfocan also retrieve information about other computers joined to your domain. ↩ -
Good to know: You can configure SSM Agent to log to CloudWatch – very useful for larger deployments. ↩